The complete painting cycle, on any kind of boat, must guarantee maximum protection against external agents, rust and much more, not forgetting the importance of the aesthetic aspect thanks to increasingly high-performance materials and colours. Let’s see what it’s all about.
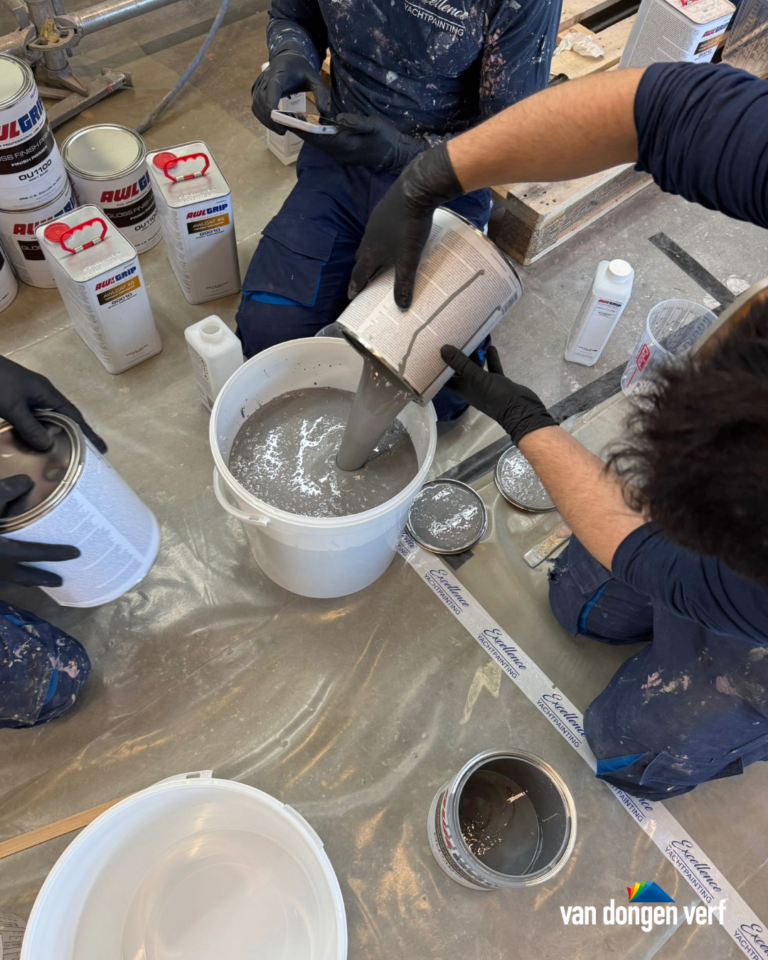
The painting of a boat is one of the most complex and costly operations: just think that two boats with the same characteristics can have very different costs according to the different types of process and materials used, the types of paint and the working cycles required. It’s always very important to find out which and how many processes will be carried out, and compare a number of estimates. Painting may also involve accessory costs: in the case of sailing yachts, for example, it may be necessary to remove the mast to take the boat into a closed space that can be kept constantly heated. It is in any case advisable to carry out an optimal preparation of the basic surface, since a poor base will never give good results. For this reason we must use filler, sand, mask and remove grease from the hull, concentrating on every part. Painting not only means making your boat look better, it means above all protecting it from the sun, salt, atmospheric agents and many other things.
The products
All products used during painting, such as primers, undercoats, fillers, glosses and antifouling must have specific characteristics and the entire cycle must be based on a correct combination of them. So there is no single cycle valid for any boat, but, according to the materials used and individual cases, the best combination of products must be found. In today’s market, where most products have reached high standards of quality, the support and advice of professionals in the sector play a fundamental role, both in finding the correct cycle, the exact colour and the proper application, and in estimating the time needed and costs of the work.
The painting cycle
A proper painting cycle consists in the application of various layers of different products which unite their specific properties to create effective and lasting protection and aesthetic results. The first step is the application of the primer, which creates a protective barrier and prepares the surface for later applications. On gelcoat in fibreglass, the fibre acts as an “anchor” for the base and the consequent finish, while on metal hulls it does a fundamental job in preventing rust and corrosion, offering protection with the cathodic principle or, in the case of primers containing zinc oxide, creating an alkaline environment that delays corrosion. On wood, primers close up the pores making the material impermeable and strong. The function of undercoats, applied after the primer, is to make the surface impermeable and create a protective base of a given thickness on which, after sanding, the final gloss can be applied. Fillers serve to even out construction irregularities or treat damage caused by corrosion, paint detachment or flaking, or impact. The filler is generally applied between one undercoat and another and is impermeable and easy to sand. Finally there are the glosses, the final coats supplied to the topsides and deck. In addition to offering bright colours and aesthetic properties, the glosses must resist abrasion, be elastic and easy to apply and offer good coverage. Then there are transparent varnishes, used to highlight wood and protected over time. Thus all phases in the painting cycle have crucial importance and the finish with gloss represents only 20% of the total working time: this explains how delicate the preparatory phases are.
The types of painting
There are three different ways of painting wood: with gloss, transparent or coloured varnish. Transparent varnish is a resinous substance coming from certain plants. The mixing of different colours of resins produces different types of copal and is used to highlight the veining of the wood. This kind of finish has excellent aesthetic characteristics, but needs continual maintenance and must be redone almost every year.
Boats in fibreglass, on the other hand, have a special gloss called gelcoat, made up of a layer of coloured polyester, generally white, that is placed on the female mould before the laying of the mats and glass fibre, which later are impregnated with various resins, vinyl, epoxy or polyester. The colour prevents ultraviolet rays damaging the fibreglass and prevents early deterioration of the hull. In many cases, above all on boats with blue or dark gelcoat, after some years the topsides tend to fade, with the colour getting lighter and losing shine.
Steel is very sensitive to oxides and so after sanding must be protected with a layer of at least 200 µm. After corrosion prevention, an iron alloy hull must be finished with epoxy resin-based fillers with a low specific weight.
Aluminium hulls are painted for purely aesthetic reasons, since this material is naturally resistant to corrosion without the need for protective paints. Aluminium must be painted after the application of layers of primer to allow the pigments to adhere to the substrate in aluminium alloy.
Finally, it must be underlined that no paint, however high its quality, can be considered eternal, because the action of atmospheric agents, contact with solvents or fuel and the action of the sun compromises its look and duration, and so there is a need for constant maintenance.
Painting wooden boats
Wood has always been considered the prince of materials both for its mechanical and aesthetic properties. But wood is more delicate than metals or fibreglass: it demands constant Karen particular attention which means investment both in time and money. Rot develops especially in conditions of great humidity and heat which favour the development of a microscopic fungus that feeds on the cellulose in the wood fibres. The material loses colour and loses strength and consistency. This process is called rot, a piece of rotten wood tends to crumble very easily. Paradoxically, the topsides of a wooden boat are more at risk than the bottom. The submerged part of the hull is smooth and uniform Underwood, apart from outlets and the terminals of instruments, does not have complex structures. So it is easy to paint and protect; and, being underwater, good sounding and waterproofing is enough. Careful application of antifouling paint solves all problems. Things get complicated on deck: the many pieces of equipment fixed on the cockpit and deckhouse allow the water to filter everywhere with the risk of serious damage. Various paints, glues and silicone help solve the problem as much as possible. When wood needs repainting with copal or polyurethane varnish, the existing varnishes completely burned by the sun or is coming off the wood, the only practical, though tiring system is to lay the wood bare using a file, but without forgetting that while solid wood can be and sandpapered even in depth, marine ply must be treated with great delicacy to avoid arriving at the glue layer immediately below the surface would. Preparing the surface to be painted well is fundamental for good repainting. Synthetic paint is easy to apply, it spreads by itself, and dries quickly, but if the surface is not close to perfect every imperfection will show and the result will be irremediably compromised.
We can have two cases of repainting: varnish that is still in good condition and just needs renewing, or old varnish that is now in a poor state and needs completely redoing. In the first case the most important operation is to clean the surface well. Fresh water and good detergents will suffice. After which it must be dried well and roughened with a light sanding. We need to know what kind of varnish we are going to cover to determine what new product will be compatible.
It’s best to know exactly what the old varnish was but, if this is not possible, we will have to carry out small tests: if after we have applied the new product on a small part of the surface there are wrinkles, blisters or similar we will need to try with another kind.
If the varnishes old and partly flaked or however to damage by simply painted over, it will have to be completely removed down to the bare wood. To remove the old varnish from wood there are two ways: chemical or heat stripping. With chemical stripping, all that is needed is the stripper, a brush to spread it and a scraper. We need to be very careful because the stripper contains chemical compounds and solvents that are highly corrosive, so it needs to be used with caution. However, it is simple to use, just apply it with a brush to the varnish and shortly this will lift up and soften, making it easy to remove with a scraper. With the heat method, using electric heaters, the varnish softens and becomes easy to remove with a scraper. Once we are down to the bare wood we can start with a complete painting cycle.
Painting fibreglass boats
There are several types of paint for fibreglass boats, each with very different performance. The most used is two component polyurethane, which guarantees an excellent finish and good resistance to abrasion. It is made up of a solution of resin and a catalyst. There are three techniques for painting a fibreglass boat. The choice depends on the surface to be painted. A brush will naturally be used only for small finishing touches, rollers and spraying are better for large surfaces. Spray painting is generally the quickest solution, but it can only be used in protected and conditioned environments with extractor fans with special filters. This is because a high percentage of the product is lost in the air and the thickness and protection is diminished as a result.
The surfaces to be painted must be washed and degreased: if the boat has been waxed the wax must be eliminated with a special solvent and an abrasive sponge. If after washing we see parts of the gelcoat with small cracks or openings we must use polyester filler paste reinforced with glass fibre. The filler dries well in a few minutes and can be smoothed. For this it is best to use an orbital sander and fine sandpaper to allow the primer to adhere well afterwards. The primer is a layer of paint applied between the gelcoat and the gloss. It is used to make the paint adhere well to the hull. Normally two coats of primer, at an interval of 24 hours, are enough. Once the primer has been applied, the painting proper can start. Temperature and humidity are important, so it is best to take these variables into consideration during the entire painting cycle. With the roller we can only paint large surfaces, while for smaller areas we will need a brush. After finishing the first coat and letting it dry it needs sanding: this is important for eliminating any stains and avoiding the formation of blisters. Then the sanded areas must be washed again, and we can apply the second coat of paint and sand it again, but this time with a 1000 grain sandpaper and plenty of water. This smooths the paint and guarantees a uniform aspect. Once the sanding is finished, we need to polish the boat. Here too we will use an orbital sander, but with a wool fibre pad to spread the wax over the surface and give it the classic shiny look.
Painting boats in metal alloy
Boats in metal alloy are generally in steel or aluminium. The former is often used for large yachts, generally of 30 m or more. Aluminium is used for superstructures because of its lightweight, but it is not uncommon to see vessels entirely built in this material. Aluminium is not corroded by water, so it can remain bare, but has big problems with corrosion due to galvanic currents produced by contact with other metals. To paint an aluminium hull we begin with the usual deep cleaning and then apply the primer which, in this case, will serve to remove the layer of aluminium oxide formed on the surface. The pickling agent contains special acids which not only remove the aluminium oxide but form tiny wrinkles needed to allow the paint to adhere. The aluminium oxide can also be removed with disc sanding or sandblasting, but these are rather demanding methods.
Once the aluminium oxide is removed, a suitable painting cycle is begun, taking care to use fillers with a low specific weight. Old paint can be removed with sandblasting or stripper, but not with heat stripping. Since aluminium corrodes easily in contact with other metals it is best to create a protective barrier also inside the hull, with one or two coats of insulating undercoat, especially in the bilge. Ordinary antifouling paint cannot be used on the bottom because cuprous oxide would compromise the metal. By now the vast majority of paint producers have special antifouling paints based on biocides obtained from organic compounds.
Steel is very sensitive to oxides. So it is very important, after the sandblasting used to lay bare the material, to apply one or more coats of primer within the following two hours, to avoid the risk of oxidation. After this, over the following days, protective layers are applied until a layer of at least 150 µm is formed, and filler is supplied. Here epoxy fillers with low specific weight are used as they permit greater thickness, product flexibility, good insulation, ease of application and sanding. Light fillers are “loaded” with hollow glass or acrylic microspheres and, after sanding, it will be necessary to apply a thick undercoat, a layer of under gloss and the final gloss.